1) Node.js
1-1) express 기본 세팅
1-1-1) server 대기 상태
1-1-2) 템플릿 엔진 설정
1-1-3) 정적파일 미들웨어 생성
1-1-4) bodyParser
1-2) 코드 정리
1) Node.js
1-1) express 기본 세팅
DBMS, 즉 데이터베이스 없이 구현할 예정
사전 숙지 사항
- express 기본 설명
- 게시판 형태 숙지
1-1-1) server 대기 상태
$ npm init -y  # package.json 파일 생성
$ npm install express  # 외장모듈인 express 설치 및 node_modules 디렉토리 생성

# server.js 파일 생성 및 실행
$ node server
const express = require("express");
const app = express();

// 서버를 대기 상태로 만듦!!
app.listen(3000, () => {
  console.log("server start");
});
1-1-2) 템플릿 엔진 설정
템플릿 엔진을 설정한다는 것은
"동적파일(페이지는 하나이지만 변수를 통해 페이지, 즉 html을 여러 개 만들 수 있는 것)을 만든다"는 의미이다!!
템플릿 엔진은 express가 기본적으로 제공하지 않음!!
--> 이에 우리가 사용할 "nunjucks"를 설치하여 사용할 예정!
$ npm install nunjucks
1-1-3) 정적파일 미들웨어 생성
"정적파일 미들웨어"의 경우, express가 기본적으로 제공하는 것이다!
// 문법 : app.use(express.static(디렉토리 명))
app.use(express.static('public'));
1-1-4) bodyParser
express는 기본적으로 req 객체의 body를 객체화해주지 않음!
(즉, express는 기본적으로 bodyParser가 구현되어 있지 않다.)
--> 따라서 "bodyParser"가 필요하다!!
(중요!!) request body를 객체화시키는 것이 "bodyParser"이다!!
app.use(express.urlencoded({ extended: false }));
1-2) 코드 정리
server.js
const express = require("express");
const nunjucks = require("nunjucks");
const app = express();
const list = [{ name: "테스트", content: "테스트", subject: "테스트" }]; // 로컬 스토리지 역할을 하는 코드(전역변수 "list") --> 단, 서버가 꺼지면 해당 데이터는 날아감!(즉, 서버가 돌아갈 때만 데이터가 업데이트됨!)
app.set("view engine", "html");
// views : 템플릿 엔진을 몰아넣을 디렉토리
nunjucks.configure("views", {
express: app,
});
// public : 정적 파일들을 모아두는 디렉토리
app.use(express.static("public")); // /js/index.js
app.use(express.urlencoded({ extended: false })); // 해당 코드가 실행되면 body를 넣어줌!!(해당 코드는 express가 bodyParser를 사용하겠다는 의미!!)
// render : 템플릿 엔진을 읽어서 body 영역을 만들어주는 메서드("render"는 화면에 그려주는 개념이 아니라 응답 메시지를 주는 개념이다!!)
app.get("/", (req, res) => {
// const name = req.query.name;
// 바로 위의 코드를 구조분해할당을 써서 짧게 수정한 코드
const { name } = req.query;
// res.render("index.html", { name: name });
// 바로 위의 코드를 구조분해할당을 써서 짧게 수정한 코드
res.render("index.html", { name });
});
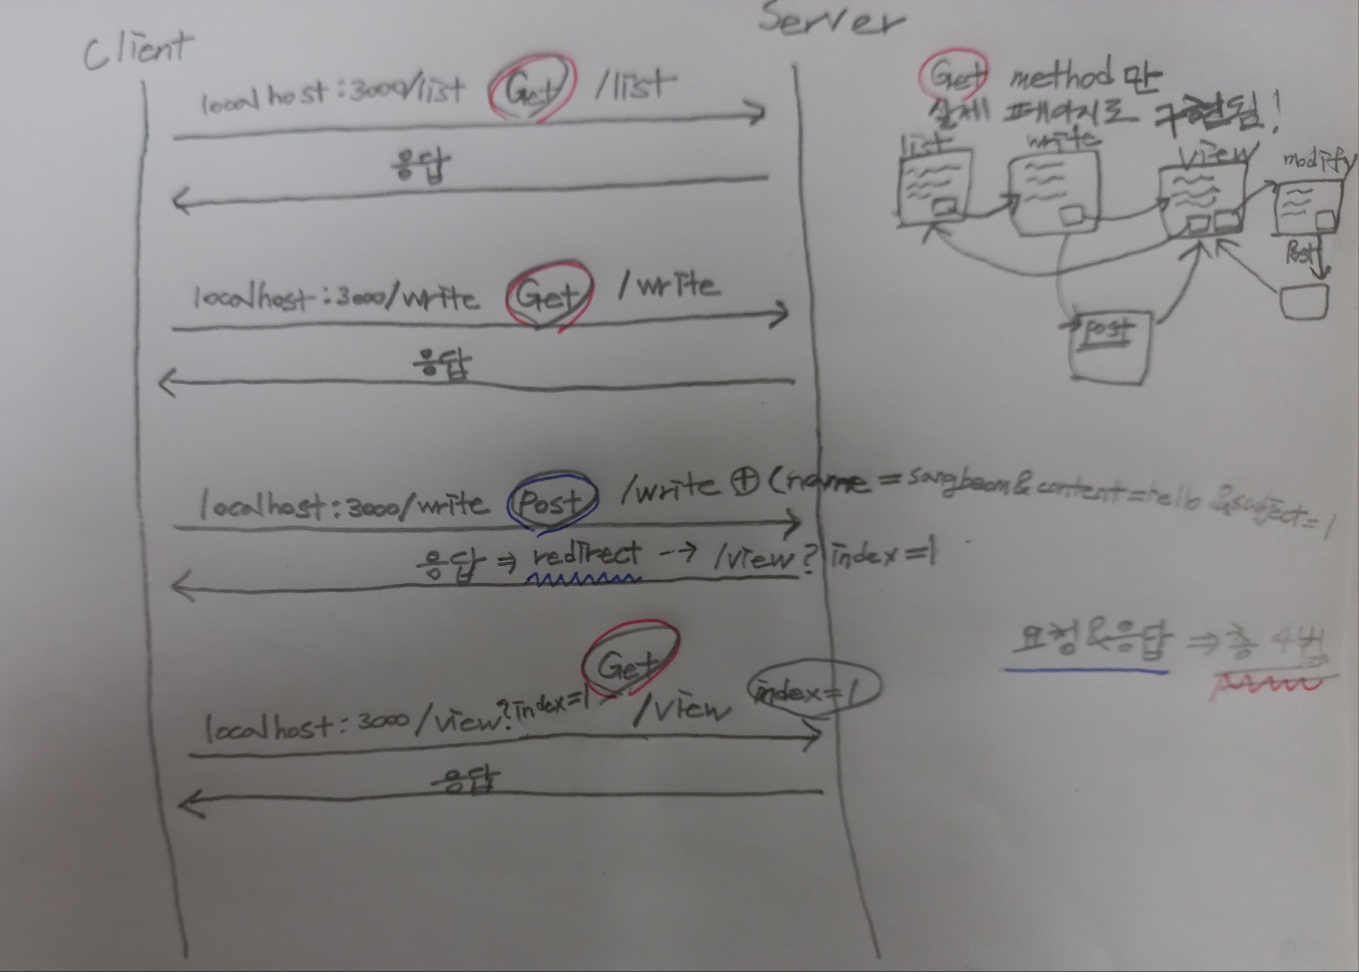
app.get("/list", (req, res) => {
// res.render("list.html", { list: list });
// 바로 위의 코드를 구조분해할당을 써서 짧게 수정한 코드
res.render("list.html", { list });
});
app.get("/write", (req, res) => {
res.render("write.html");
});
app.post("/write", (req, res) => {
// const subject = req.body.subject
// const name = req.body.name
// const content = req.body.content
// 위의 코드들을 객체 구조분해할당을 사용하여 간략히 표현한 코드
const { subject, content, name } = req.body; // 해당 코드는 객체 구조분해할당 구문이라 배열 구조분해할당(인덱스가 기준이 되기에 배열 안 요소의 순서가 굉장히 중요함!!)과 달리 순서가 상관없음!!
// console.log(subject, content, name);
list.push({ subject, content, name });
res.redirect(`/view?index=${list.length - 1}`);
});
app.get("/view", (req, res) => {
// const index = req.query.index
// 바로 위의 코드를 구조분해할당을 써서 짧게 수정한 코드
const { index } = req.query;
console.log(list[index]); // 배열 안의 객체가 출력됨!! --> {name: 'sangbeom', content: '테스트 내용', subject: '게시글 1'}
res.render("view.html", {
name: list[index].name,
content: list[index].content,
subject: list[index].subject,
});
// res.render('view.html', {...list[index]}) --> 스프레드 문법(해당 배열 안의 요소를 모두 꺼내서 펼쳐줌!)을 사용하여 위의 코드를 간단히 표현한 코드
});
app.listen(3000, () => {
console.log("server start");
});
index.html
alert("hello world!");
index.js
<!DOCTYPE html>
<html lang="en">
  <head>
    <meta charset="UTF-8" />
    <meta http-equiv="X-UA-Compatible" content="IE=edge" />
    <meta name="viewport" content="width=device-width, initial-scale=1.0" />
    <title>Document</title>
    <script type="text/javascript" src="/js/index.js"></script>
  </head>
  <body>
    {{name}} Hello world~~!!!
    <a href="/list">리스트 바로가기</a>
  </body>
</html>
list.html
<!DOCTYPE html>
<html lang="en">
  <head>
    <meta charset="UTF-8" />
    <meta http-equiv="X-UA-Compatible" content="IE=edge" />
    <meta name="viewport" content="width=device-width, initial-scale=1.0" />
    <title>Document</title>
  </head>
  <body>
    <h1>게시판 리스트 입니다.</h1>
    <table>
      <tr>
        <td>번호</td>
        <td>제목</td>
        <td>작성자</td>
        <td>작성내용</td>
      </tr>
      {% for item in list %}
      <tr>
        <td>{{loop.index-1}}</td>
        <td><a href="/view?index={{loop.index-1}}">{{item.subject}}</a></td>
        <td>{{item.name}}</td>
        <td>{{item.content}}</td>
      </tr>
      {% endfor %}
    </table>
    {{list[0].name}} {{list[0].content}} {{list[0].subject}}
    <a href="/write">글작성</a>
  </body>
</html>
※ loop.index의 경우, "0"이 아니라 "1"부터 시작하기에 여기에 "-1"을 해줘야 배열 인덱스를 정확히 구할 수 있음!!
write.html
<!DOCTYPE html>
<html lang="en">
  <head>
    <meta charset="UTF-8" />
    <meta http-equiv="X-UA-Compatible" content="IE=edge" />
    <meta name="viewport" content="width=device-width, initial-scale=1.0" />
    <title>Document</title>
  </head>
  <body>
    <form method="post" action="/write">
      <ul>
        <li>제목 : <input type="text" name="subject" /></li>
        <li>이름 : <input type="text" name="name" /></li>
        <li>
          내용 <br />
          <textarea name="content"></textarea>
        </li>
      </ul>
      <button type="submit">전송</button>
    </form>
  </body>
</html>
view.html
<!DOCTYPE html>
<html lang="en">
  <head>
    <meta charset="UTF-8" />
    <meta http-equiv="X-UA-Compatible" content="IE=edge" />
    <meta name="viewport" content="width=device-width, initial-scale=1.0" />
    <title>Document</title>
  </head>
  <body>
    <h2>view 페이지 입니다.</h2>
    <ul>
      <li>제목 : {{subject}}</li>
      <li>작성자 : {{name}}</li>
      <li>
        내용 <br />
        {{content}}
      </li>
    </ul>
    <a href="/list">리스트 보기</a>
  </body>
</html>
'Node.js' 카테고리의 다른 글
| Node.js(11) - AJAX 기본 포맷, server 분리(front/back) 구현 (0) | 2023.01.03 |
|---|---|
| Node.js(10) - express를 활용한 게시판 구현(CRUD) 및 Router 나누기 (0) | 2022.12.20 |
| Node.js(8) - express (0) | 2022.12.14 |
| Node.js(7) - HTTP, 동적 웹 페이지 구현 (0) | 2022.12.13 |
| Node.js(6) - HTTP, Node.js 내부 카테고리, file system, HTML 불러오기 (0) | 2022.12.12 |


