728x90
반응형
1) React
1-1) Login 버튼
1-2) comment(댓글) CR(Create, Read)
1) React
1-1) Login 버튼
이번 chapter에서 살펴볼 내용
- ReactDOM
- JSX
- state
- Component, Props
- 생명주기
- 조건부 rendering
JSX
// App Component가 있다고 가정함!
React.createElement(App, null, "hi~~~")

// div Element에 내용을 "hi~~~"로 넣기
React.createElement("div", null, "hi~~~")

// babel의 도움을 받아서 JSX
// React.createElement(App, null, "hi~~~") --> JSX
// React.createElement('Element 이름', '속성', 'innerHTML')
// 이때 "props"는 null(속성)과 "hi~~~"(innerHTML) 둘 다이다!
// 여기서 "hi~~~"는 "props.children"에 들어 있다!
// React.createElement(App, null, "hi~~~")
<APP>hi~~~</App>

// React.createElement("div", null, "hi~~~")

<div>hi~~~</div>

<div></div>
<div>Hello World~~!</div>
login_btn.html
<!DOCTYPE html>
<html lang="en">
  <head>
    <meta charset="UTF-8" />
    <meta http-equiv="X-UA-Compatible" content="IE=edge" />
    <meta name="viewport" content="width=device-width, initial-scale=1.0" />
    <title>Document</title>
    <script
      crossorigin
      src="https://unpkg.com/react@18/umd/react.development.js"
    ></script>
    <script
      crossorigin
      src="https://unpkg.com/react-dom@18/umd/react-dom.development.js"
    ></script>
    <script src="https://unpkg.com/@babel/standalone/babel.min.js"></script>
  </head>
  <body>
    <div id="root"></div>
    <script type="text/babel">
      class Word extends React.Component {
        constructor(props) {
          super(props);
        }

        render() {
          return <h2>{this.props.text}</h2>;
        }
      }

      class LoginText extends React.Component {
        constructor(props) {
          super(props);
        }

        // {this.state.isLogin ? "로그아웃" : "로그인"}
        render() {
          // 조건부 rendering
          return this.props.flag ? (
            <Word text="로그아웃" />
          ) : (
            <Word text="로그인" />
          );
        }
      }

      class LoginBtn extends React.Component {
        constructor(props) {
          super(props);
          this.state = {
            isLogin: false,
          };
          this.handleClick = this.handleClick.bind(this);
        }

        handleClick() {
          // console.log(this);
          this.setState({ isLogin: !this.state.isLogin });
        }

        render() {
          return (
            <button onClick={this.handleClick}>
              <LoginText flag={this.state.isLogin} />
            </button>
          );
        }
      }

      // component를 만들 시 첫글자는 반드시 대문자여야 한다는 규칙이 있다!
      // App Component: 일반적으로 크게 감싸고 시작하는 Component
      class App extends React.Component {
        constructor(props) {
          super(props);
          // children
          // property

          // props.children
          console.log(props);

          this.state = {
            isLogin: false,
          };
        }

        render() {
          return (
            <div>
              <Word text="hello world~~@" />
              <LoginBtn />
            </div>
          );
        }
      }
      const root = ReactDOM.createRoot(document.querySelector("#root"));
      // root.render(<div>Hello World!</div>);
      root.render(<App />);
      // root.render(
      //   <App id="hello" onClick="asdf">
      //     hi~~~
      //   </App>
      // );
    </script>
  </body>
</html>
데이터가 한 방향으로만 흘러간다는 것이 React의 큰 단점 중 하나이다!
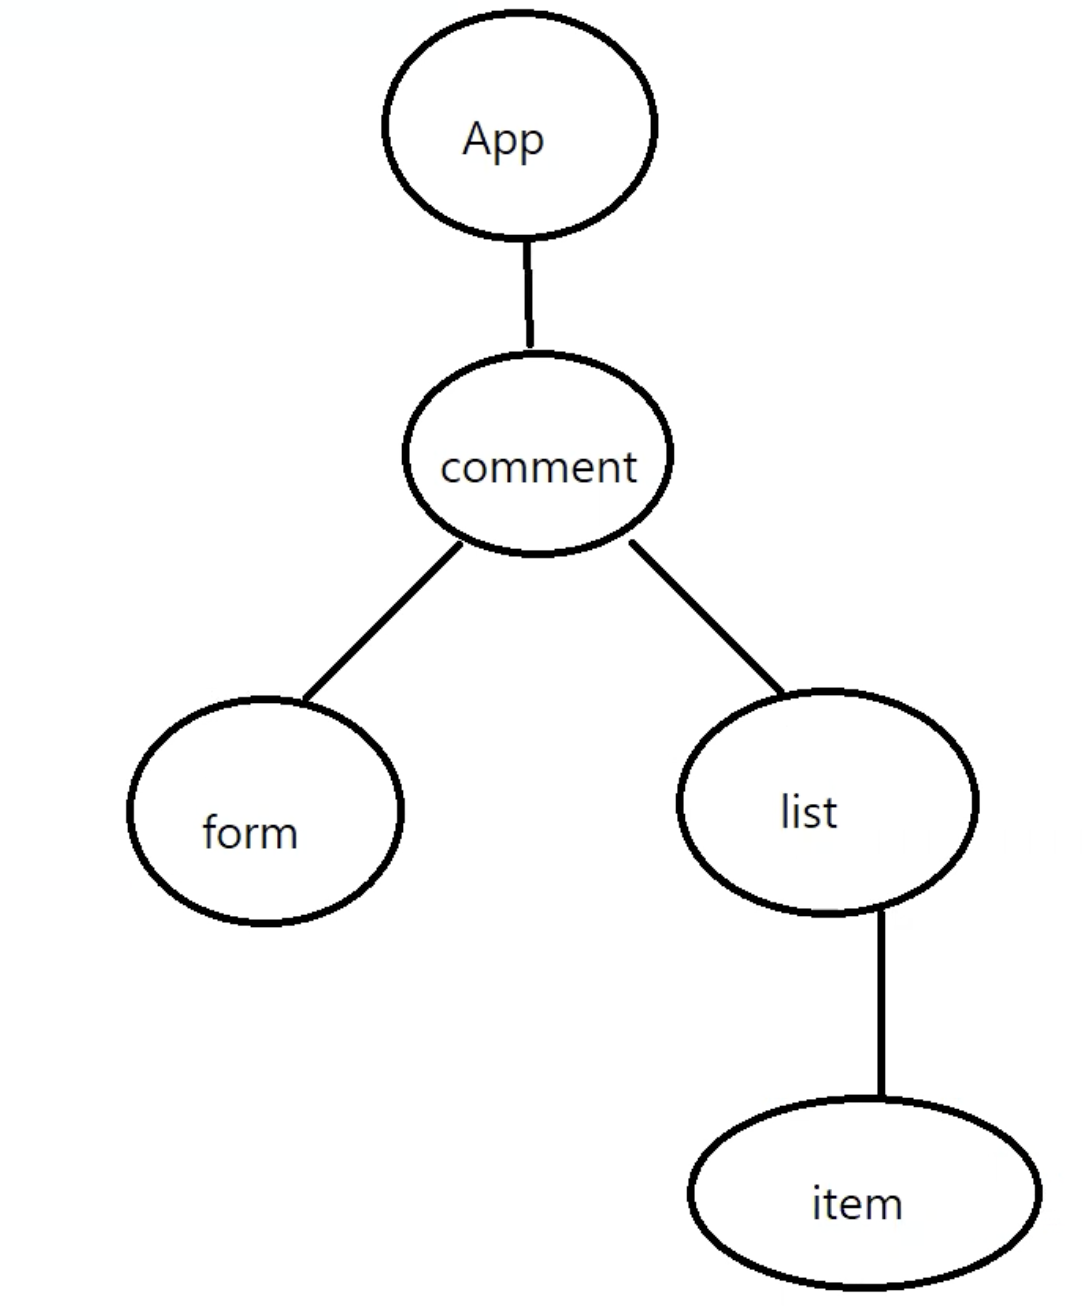
1-2) comment(댓글) CR(Create, Read)
comment 구현 사전작업 : Component 구조 정리
comment.html
<!DOCTYPE html>
<html lang="en">
  <head>
    <meta charset="UTF-8" />
    <meta http-equiv="X-UA-Compatible" content="IE=edge" />
    <meta name="viewport" content="width=device-width, initial-scale=1.0" />
    <title>Document</title>
    <script
      crossorigin
      src="https://unpkg.com/react@18/umd/react.development.js"
    ></script>
    <script
      crossorigin
      src="https://unpkg.com/react-dom@18/umd/react-dom.development.js"
    ></script>
    <script src="https://unpkg.com/@babel/standalone/babel.min.js"></script>
    <link rel="stylesheet" href="./comment.css" />
  </head>
  <body>
    <div id="root"></div>
    <script type="text/babel">
      class CommentItem extends React.Component {
        render() {
          return (
            <ul className="comment-row">
              <li className="comment-id">{this.props.userid}</li>
              <li className="comment-content">{this.props.content}</li>
              <li className="comment-date">{this.props.date}</li>
            </ul>
          );
        }
      }

      class CommentForm extends React.Component {
        constructor(props) {
          super(props);
          // console.log(this.props.create);
          this.submitHandler = this.submitHandler.bind(this);
          this.changeHandler = this.changeHandler.bind(this);
          this.state = {
            value: "",
          };
        }

        changeHandler(e) {
          const { value } = e.target;

          this.setState({
            ...this.state,
            value,
          });

          // this.setState({
          //   ...this.state,
          //   value: e.target.value,
          // });
        }

        submitHandler(e) {
          e.preventDefault();
          this.props.create(this.state.value);
          this.setState({ value: "" });

          // this.props.create(e.target.commentInput.value) --> 여기서 commentInput은 아래 "ps_box" class명을 가진 span 태그 내의 input 태그의 id명을 "commentInput"으로 할 경우 사용 가능한 코드
          // e.target.reset();
          // e.target.commentInput.focus();
        }

        render() {
          return (
            <li className="comment-form">
              <form onSubmit={this.submitHandler}>
                <h4>
                  댓글쓰기 <span>({this.props.length})</span>
                </h4>
                <span className="ps_box">
                  <input
                    type="text"
                    onChange={this.changeHandler}
                    className="int"
                    value={this.state.value}
                    placeholder="댓글 내용을 입력해주세요!"
                  />
                </span>
                <input type="submit" value="등록" className="btn" />
              </form>
            </li>
          );
        }
      }

      class CommentList extends React.Component {
        // this.props.items의 데이터 타입 : Array(배열)
        loop(v, k) {
          return (
            <CommentItem
              key={k}
              userid="web7722"
              content={v.content}
              date="2023-02-22"
            />
          );
        }

        render() {
          return <li>{this.props.items.map(this.loop)}</li>;
        }
      }

      class Comment extends React.Component {
        constructor(props) {
          super(props);
          this.state = {
            comment: [
              {
                userid: "web7722",
                content: "hi comment1",
                date: "2023-02-22",
              },
              {
                userid: "web7722",
                content: "hi comment2",
                date: "2023-02-22",
              },
              {
                userid: "web7722",
                content: "hi comment3",
                date: "2023-02-22",
              },
            ],
          };

          // comment data의 형태가 "[{userid: 'aa', content: 'asdfg', date: '2023-02-24'}, {}, {}]" 이렇게 돼야 저장하기 용이하다!
          this.create = this.create.bind(this);
        }

        // props로 값을 넘길 수 있음
        // comment에서 자기 자신의 상태를 바꿀 수 있는 함수를 만듦
        create(content) {
          // setState: state(상태)를 바꾸겠다는 메서드
          this.setState({
            comment: [
              { userid: "web7722", content, date: "2023-02-22" },
              ...this.state.comment,
            ],
          });
        }

        render() {
          return (
            // "class"라는 예약어가 이미 있기 때문에 class 명을 지정할 때는 "className"을 사용해야 한다!
            <ul className="comment">
              <CommentForm
                create={this.create}
                length={this.state.comment.length}
              />
              <CommentList items={this.state.comment} />
            </ul>
          );
        }
      }

      class App extends React.Component {
        render() {
          return (
            <div>
              <Comment />
              <Comment />
              <Comment />
            </div>
          );
        }
      }

      const root = ReactDOM.createRoot(document.querySelector("#root"));
      root.render(<App />);
    </script>
  </body>
</html>
comment.css
* {
  margin: 0;
  padding: 0;
}

body {
  font-family: "Noto Sans KR", sans-serif;
  font-weight: 300;
}

ul,
li {
  list-style: none;
}

.comment {
  display: flex;
  flex-direction: column;
  flex-wrap: nowrap;
  padding: 30px;
  width: 600px;
  margin: 0 auto;
}

.comment > li {
  margin-top: 20px;
}

.comment > li:nth-child(1) {
  margin: 0px;
}

.comment-row {
  display: flex;
  justify-content: space-between;
  flex-direction: row;
}

.comment-row {
  margin-top: 20px;
  width: 100%;
}

.comment-row > li:nth-child(2) {
  flex-shrink: 0;
  flex-grow: 1;
  padding-left: 25px;
  z-index: 1;
  width: 100%;
}

.comment-row > li:nth-child(2) {
  width: 85px;
}

.comment-form > form {
  display: flex;
  flex-direction: row;
  flex-wrap: wrap;
  justify-content: space-between;
}

.comment-form > form > h4 {
  width: 100%;
  margin: 14px 0 14px 0;
}

.comment-content {
  word-break: break-all;
  padding-right: 25px;
}

.ps_box {
  display: block;
  position: relative;
  width: 80%;
  height: 51px;
  border: solid 1px #dadada;
  padding: 10px 14px 10px 14px;
  background: #fff;
  box-sizing: border-box;
}

.ps_box > input {
  outline: none;
}

.int {
  display: block;
  position: relative;
  width: 100%;
  height: 29px;
  padding-right: 25px;
  line-height: 29px;
  border: none;
  background: #fff;
  font-size: 15px;
  box-sizing: border-box;
  z-index: 10;
}

.btn {
  width: 18%;
  padding: 18px 0 16px;
  text-align: center;
  box-sizing: border-box;
  text-decoration: none;
  border: none;
  background: #333;
  color: #fff;
  font-size: 14px;
}

.comment-delete-btn {
  display: inline-block;
  margin-left: 7px;
  cursor: pointer;
}

.comment-update-input {
  border: none;
  border-bottom: 1px solid #333;
  font-size: 16px;
  color: #666;
  outline: none;
}
'React' 카테고리의 다른 글
| React(4) - 대화형 틱택토 게임 구현 (0) | 2023.02.24 |
|---|---|
| React(3) - Counter 구현, React 주요 개념 복습 및 comment(댓글) 구현 복습 (0) | 2023.02.23 |
| React - React 기본 및 DOM, Babel, class, component (0) | 2023.02.21 |


