1) SpringBoot
1-1) Thymeleaf 예제(경로 생성과 하이퍼링크, 객체 출력, 포매팅, 문자열 다루기, 제어문, 리스트와 맵)
1-2) 추가 정리 사항
1) SpringBoot
1-1) Thymeleaf 예제(경로 생성과 하이퍼링크, 객체 출력, 포매팅, 문자열 다루기, 제어문, 리스트와 맵)
(1) [src/main/java] - [net.datasa.web2.controller] 안에 Thymeleaf Controller.java 파일 생성 후 아래와 같이 작성
package net.datasa.web2.controller;

import java.util.ArrayList;
import java.util.Date;
import java.util.HashMap;

import org.springframework.stereotype.Controller;
import org.springframework.ui.Model;
import org.springframework.web.bind.annotation.GetMapping;
import org.springframework.web.bind.annotation.RequestMapping;

import lombok.extern.slf4j.Slf4j;
import net.datasa.web2.domain.Person;

@Controller
@RequestMapping("th")
@Slf4j
public class ThymeleafController {
	@GetMapping("thymeleaf1")
	public String thymeleaf1(Model model) {
		String str = "문자열";
		int num = 3;
		Person p = new Person("홍길동", 20, "010-1111-2222");
		String tag = "<marquee>HTML 태그가 포함된 문자열</marquee>";
		String url = "https://google.com";

		model.addAttribute("str", str);
		model.addAttribute("num", num);
		model.addAttribute("person", p);
		model.addAttribute("tag", tag);
		model.addAttribute("url", url);

		int n1 = 1000000;
		double n2 = 123.45678;
		double n3 = 0.5;
		Date today = new Date();

		model.addAttribute("n1", n1);
		model.addAttribute("n2", n2);
		model.addAttribute("n3", n3);
		model.addAttribute("today", today);

		String values = "Java,HTML,CSS";
		model.addAttribute("values", values);

		return "thView/thymeleaf1";
	}

	@GetMapping("thymeleaf2")
	public String thymeleaf2(Model model) {
		ArrayList<String> list = new ArrayList<>();
		list.add("aaaa");
		list.add("가나다라");
		list.add("12345");

		HashMap<String, Object> map = new HashMap<>();
		map.put("product", "키보드");
		map.put("price", 10000);

		ArrayList<Person> personlist = new ArrayList<>();
		personlist.add(new Person("김", 10, "010-1111-2222"));
		personlist.add(new Person("이", 20, "010-3333-2222"));
		personlist.add(new Person("박", 30, "010-4444-5555"));

		model.addAttribute("list", list);
		model.addAttribute("map", map);
		model.addAttribute("personlist", personlist);

		return "thView/thymeleaf2";
	}
}
(2) [src/main/resources] - [templates.thView] 안에 thymeleaf1.html 파일 생성 후 아래와 같이 작성
<!DOCTYPE html>
<html xmlns:th="http://thymeleaf.org"
xmlns:sec="http://www.thymeleaf.org/extras/spring-security">
<head>
<meta charset="UTF-8">
<title>thymeleaf1</title>
</head>
<body>
<h1>[ Thymeleaf 문법1 ]</h1>
<h3>값 출력</h3>
<p>[[${str}]]</p>
<!-- 바로 위의 코드와 결과는 동일하지만 아래 방식 사용을 더 추천함 -->
<p th:text="${str}">임시문자열</p>
<p th:text="${num}">000</p>
<p>이름 : <span th:text=${person.name}>홍길동</span></p>
<p th:text="${tag}"></p>
<p th:utext="${tag}"></p>
<br>
<!-- <br> : "<br>"의 텍스트가 브라우저 화면에 그대로 출력됨 -->
<br>
<h3>주석</h3>
<!-- HTML 주석 -->
<script>
// Javascript 주석
/* Javascript 주석 */
</script>
<!--/* 타임리프 주석 */-->
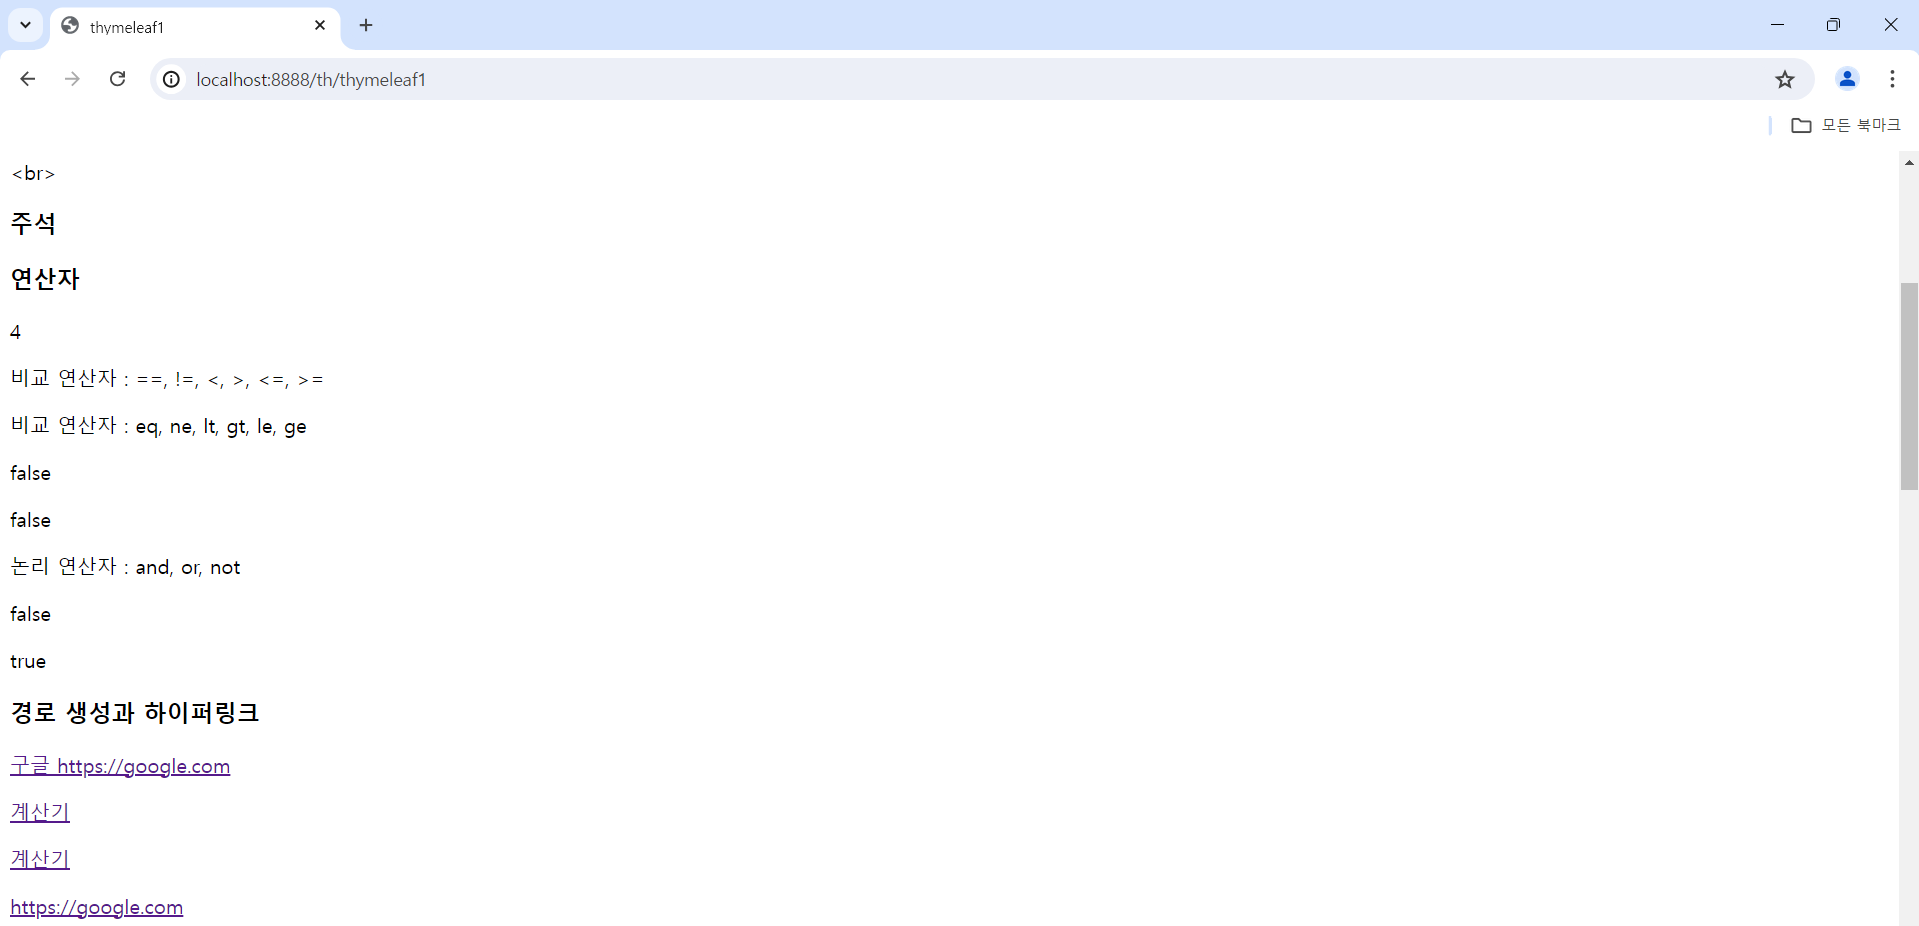
<h3>연산자</h3>
<p th:text="${num + 1}">000</p>
<p>비교 연산자 : ==, !=, <, >, <=, >=</p>
<p>비교 연산자 : eq, ne, lt, gt, le, ge</p>
<p th:text="${num > 10}"></p>
<p th:text="${num gt 10}"></p>
<p>논리 연산자 : and, or, not</p>
<p th:text="${num gt 10 and num lt 50}"></p>
<!-- num이 3의 배수이거나 5의 배수이면 true -->
<p th:text="${num % 3 eq 0 or num % 5 eq 0}"></p>
<h3>경로 생성과 하이퍼링크</h3>
<p>
<a href="https://google.com">구글 https://google.com</a>
</p>
<p>
<a href="../ex/calc1">계산기</a>
</p>
<p>
<a href="/ex/calc1">계산기</a>
</p>
<p>
<a th:text="${url}" th:href="${url}"></a>
</p>
<p>
<a th:href="@{/ex/calc1}"></a>
</p>
<!-- static/images/userImg.png -->
<p>
<img th:src="@{/images/userImg.png}"></a>
</p>
<!--
http://localhost:8888/th/thymeleaf1
http://localhost:8888/ex/calc1
http://localhost:8888/test/test/thymeleaf1
-->
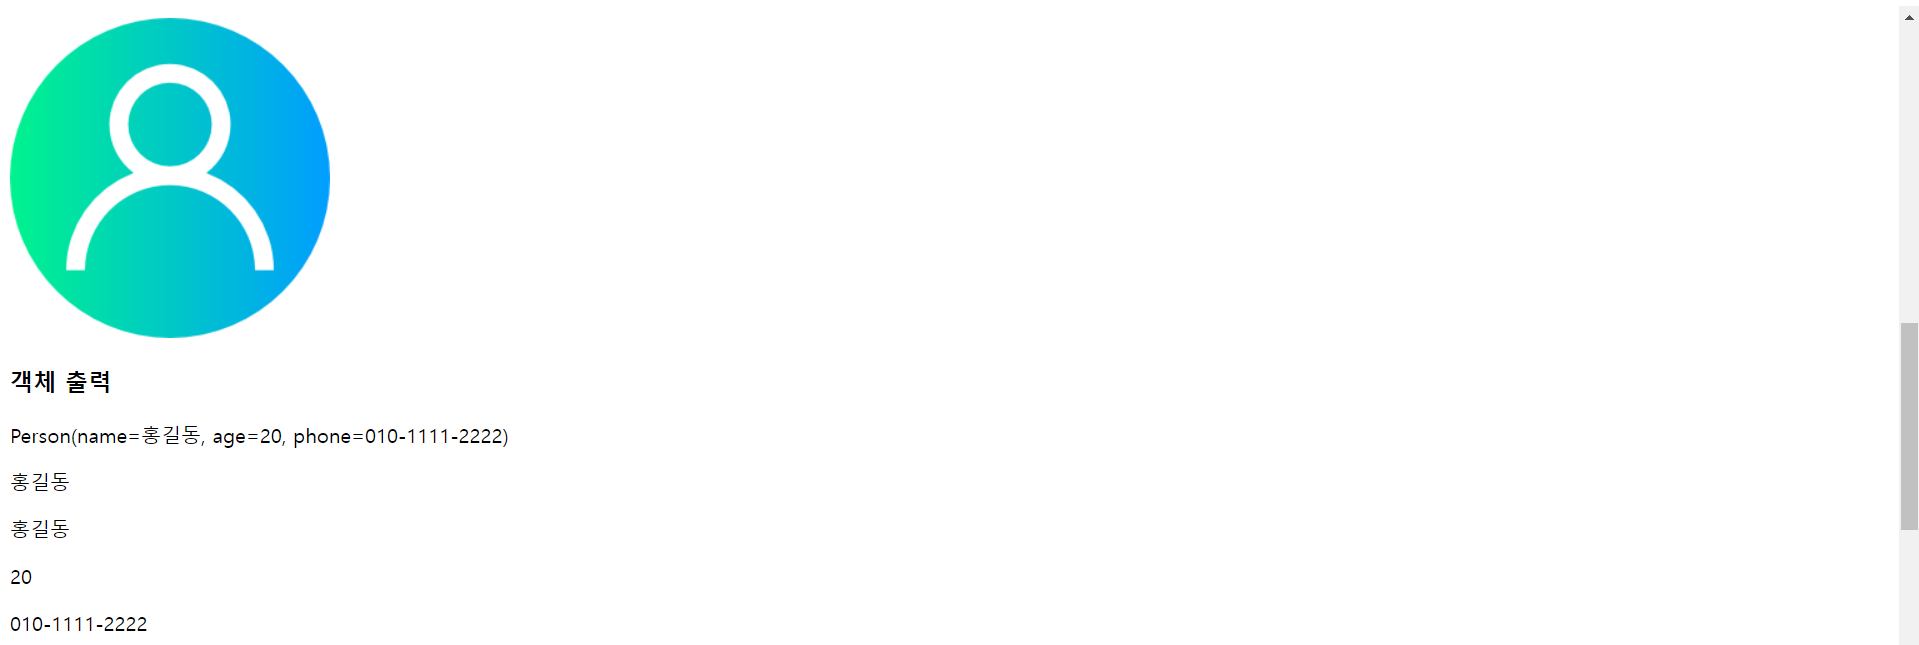
<h3>객체 출력</h3>
<p th:text="${person}"></p>
<p th:text="${person.name}"></p>
<div th:object="${person}">
<p th:text="*{name}"></p>
<p th:text="*{age}"></p>
<p th:text="*{phone}"></p>
</div>
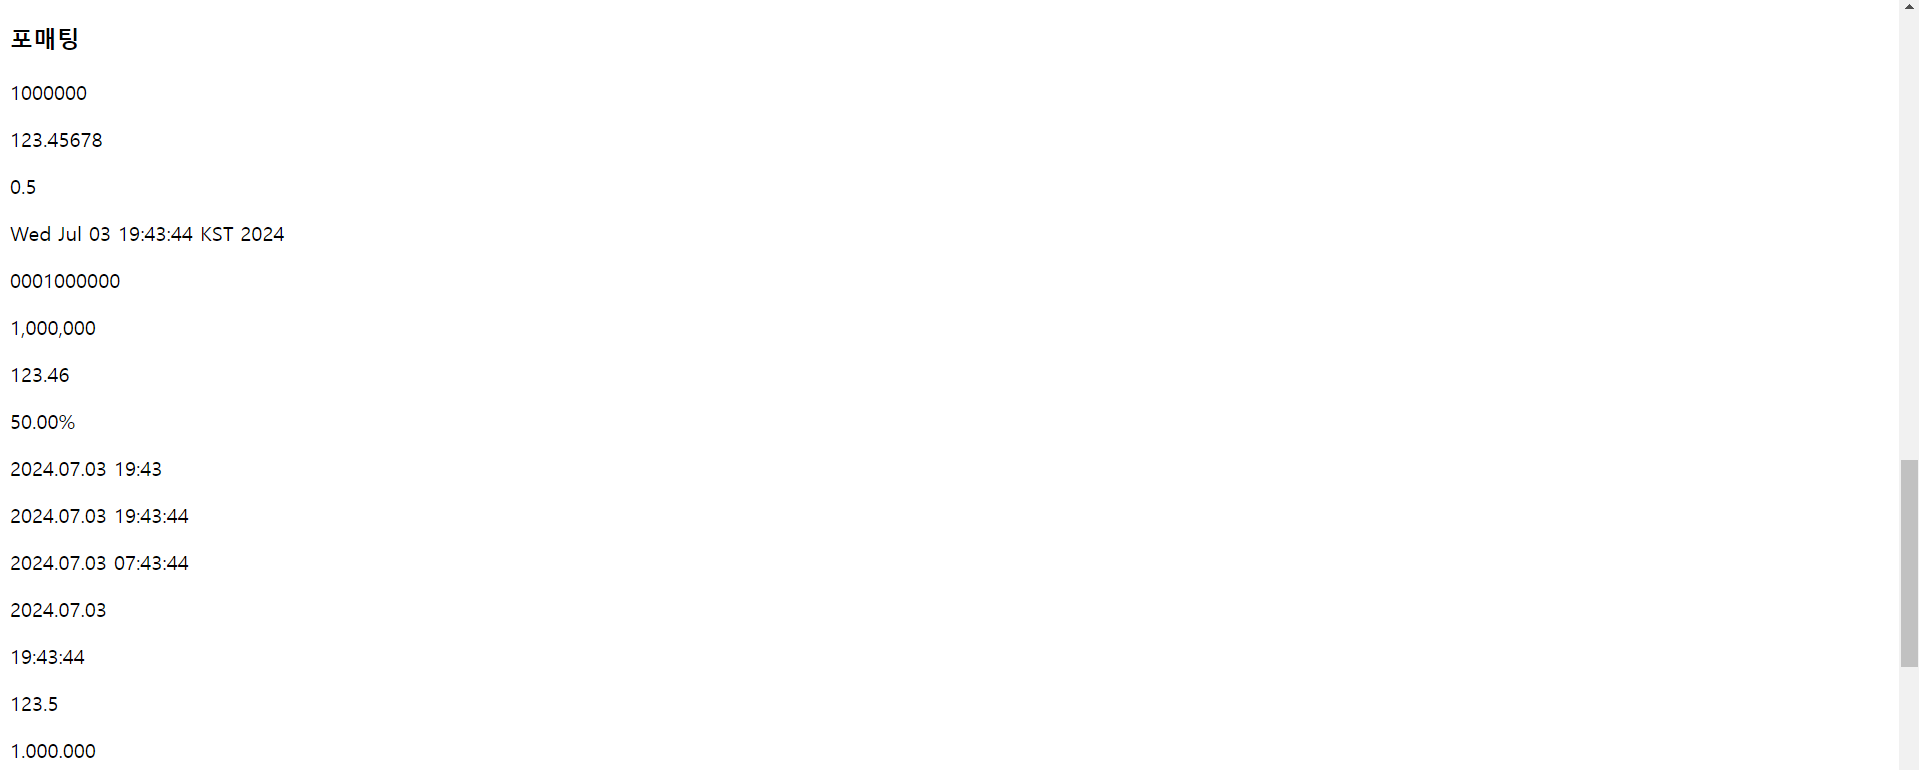
<h3>포매팅</h3>
<p th:text="${n1}"></p>
<p th:text="${n2}"></p>
<p th:text="${n3}"></p>
<p th:text="${today}"></p>
<p th:text="${#numbers.formatInteger(n1, 10)}"></p>
<p th:text="${#numbers.formatInteger(n1, 3, 'COMMA')}"></p>
<p th:text="${#numbers.formatDecimal(n2, 3, 'COMMA', 2, 'POINT')}"></p>
<p th:text="${#numbers.formatPercent(n3, 0, 2)}"></p>
<p th:text="${#dates.format(today, 'yyyy.MM.dd HH:mm')}"></p>
<p th:text="${#dates.format(today, 'yyyy.MM.dd HH:mm:ss')}"></p>
<p th:text="${#dates.format(today, 'yyyy.MM.dd hh:mm:ss')}"></p>
<p th:text="${#dates.format(today, 'yyyy.MM.dd')}"></p>
<p th:text="${#dates.format(today, 'HH:mm:ss')}"></p>
<p th:text="${#numbers.formatDecimal(n2, 3, 'COMMA', 1, 'POINT')}"></p>
<p th:text="${#numbers.formatInteger(n1, 3, 'POINT')}"></p>
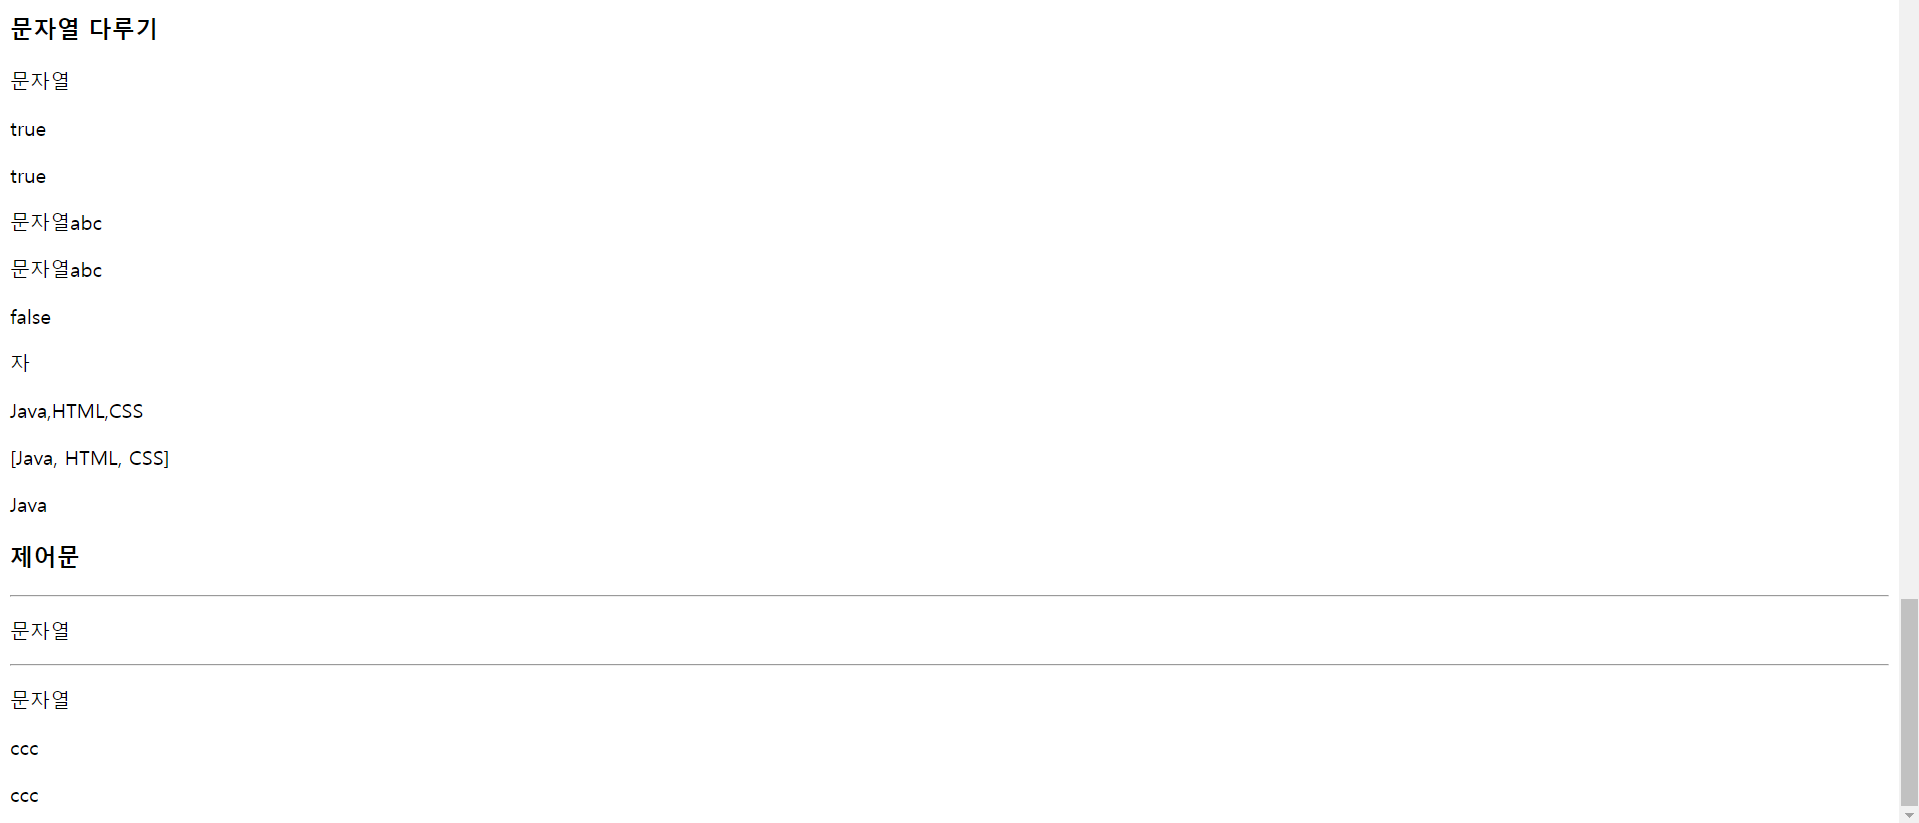
<h3>문자열 다루기</h3>
<p th:text="${str}"></p>
<p th:text="${str == '문자열'}"></p>
<p th:text="${str.equals('문자열')}"></p>
<p th:text="${str + 'abc'}"></p>
<p th:text="|${str}abc|"></p>
<p th:text="${#strings.isEmpty(str)}"></p>
<p th:text="${#strings.substring(str, 1, 2)}"></p>
<p th:text="${values}"></p>
<p th:text="${#strings.listSplit(values, ',')}"></p>
<p th:text="${#strings.listSplit(values, ',')[0]}"></p>
<h3>제어문</h3>
<div th:if="${str != null}">
<hr>
<p th:text="${str}"></p>
</div>
<div th:if="${str == '문자열'}">
<hr>
<p th:text="${str}"></p>
</div>
<div th:unless="${str == '문자열'}">
<hr>
<p th:text="기타"></p>
</div>
<!-- num 값이 1이면 "aaa", 2이면 "bbb", 그 외의 값이면 "ccc"라고 출력 -->
<p th:if="${num == 1}" th:text="aaa"></p>
<p th:if="${num == 2}" th:text="bbb"></p>
<p th:if="${num != 1 and num != 2}" th:text="ccc"></p>
<div th:switch="${num}">
<p th:case="1" th:text="aaa"></p>
<p th:case="2" th:text="bbb"></p>
<p th:case="*" th:text="ccc"></p>
</div>
</body>
</html>
(3) [src/main/resources] - [templates.thView] 안에 thymeleaf2.html 파일 생성 후 아래와 같이 작성
<!DOCTYPE html>
<html xmlns:th="http://thymeleaf.org"
xmlns:sec="http://www.thymeleaf.org/extras/spring-security">
<head>
<meta charset="UTF-8">
<title>thymeleaf2</title>
</head>
<body>
<h1>[ Thymeleaf 문법2 ]</h1>
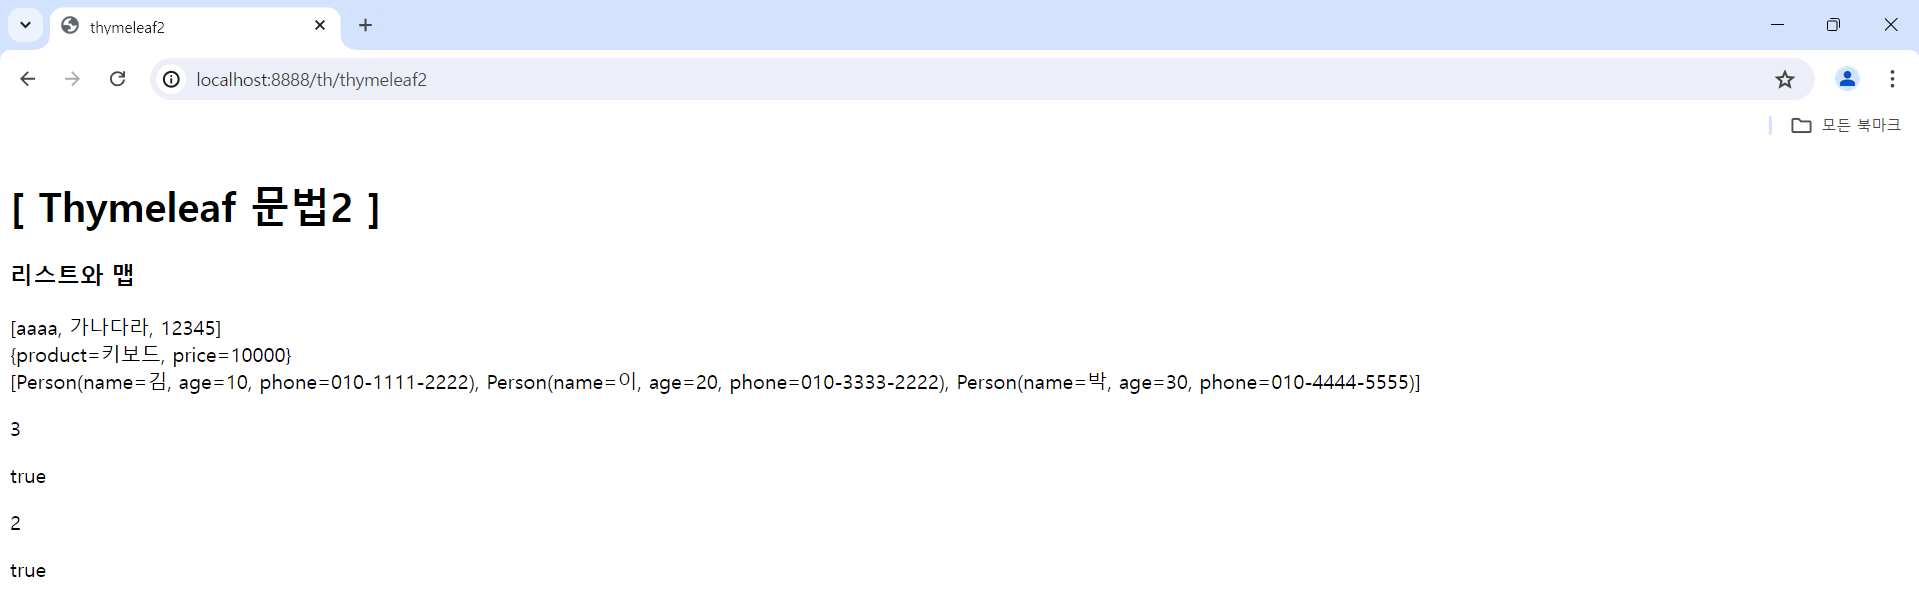
<h3>리스트와 맵</h3>
<div>[[${list}]]</div>
<div>[[${map}]]</div>
<div>[[${personlist}]]</div>
<p th:text="${#lists.size(list)}"></p>
<p th:text="${#lists.contains(list, 'aaaa')}"></p>
<p th:text="${#maps.size(map)}"></p>
<p th:text="${#maps.containsKey(map, 'price')}"></p>
</body>
</html>
(4) [src/main/resources] - [templates] 안에 home.html 파일 생성 후 아래와 같이 작성
<!DOCTYPE html>
<html xmlns:th="http://thymeleaf.org"
xmlns:sec="http://www.thymeleaf.org/extras/spring-security">
<head>
<meta charset="UTF-8">
<title>web2</title>
</head>
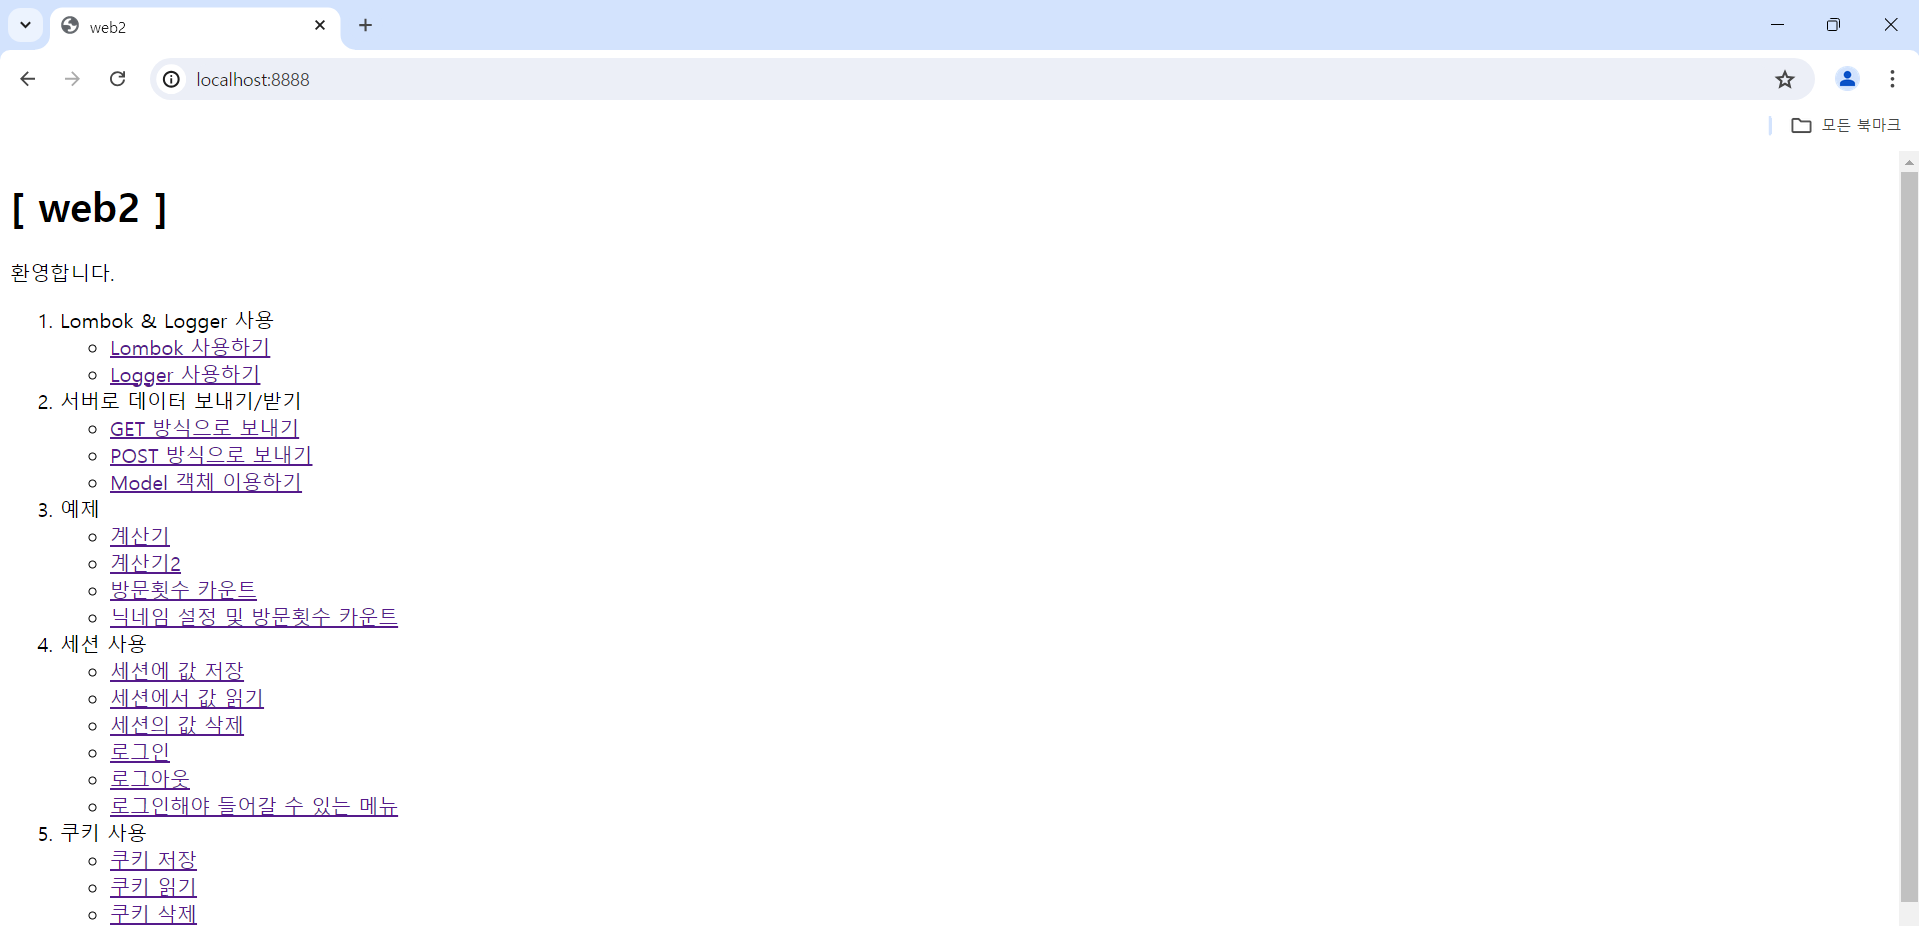
<body>
<h1>[ web2 ]</h1>
<p th:if="${session.loginId != null}" th:text="로그인해야만보이는페이지"></p>
<p th:if="${session.loginId == null}" th:text="환영합니다."></p>
<ol>
<li>Lombok & Logger 사용
<ul>
<li>
<a href="lom/lombok">Lombok 사용하기</a>
</li>
<li>
<a href="lom/logger">Logger 사용하기</a>
</li>
<!--
여기는 메인화면입니다. 위의 l은 소문자 L입니다.
글꼴 때문에 꼬부라져 보이는 것입니다.
-->
</ul>
</li>
<li>서버로 데이터 보내기/받기
<ul>
<li>
<a href="param/view1">GET 방식으로 보내기</a>
</li>
<li>
<a href="param/view2">POST 방식으로 보내기</a>
</li>
<li>
<a href="param/model">Model 객체 이용하기</a>
</li>
</ul>
</li>
<li> 예제
<ul>
<li>
<a href="ex/calc1">계산기</a>
</li>
<li>
<a href="ex/calc2">계산기2</a>
</li>
<li>
<a href="ex/count">방문횟수 카운트</a>
</li>
<li>
<a href="ex/count2">닉네임 설정 및 방문횟수 카운트</a>
</li>
</ul>
</li>
<li> 세션 사용
<ul>
<li>
<a href="ss/session1">세션에 값 저장</a>
</li>
<li>
<a href="ss/session2">세션에서 값 읽기</a>
</li>
<li>
<a href="ss/session3">세션의 값 삭제</a>
</li>
<li>
<a href="ss/login">로그인</a>
</li>
<li>
<a href="ss/logout">로그아웃</a>
</li>
<li>
<a href="ss/loginTest">로그인해야 들어갈 수 있는 메뉴</a>
</li>
</ul>
</li>
<li> 쿠키 사용
<ul>
<li>
<a href="ck/cookie1">쿠키 저장</a>
</li>
<li>
<a href="ck/cookie2">쿠키 읽기</a>
</li>
<li>
<a href="ck/cookie3">쿠키 삭제</a>
</li>
</ul>
</li>
<li> localStorage와 sessionStorage의 사용
<ul>
<li>
<a href="local/save">값 저장</a>
</li>
<li>
<a href="local/read">값 읽기</a>
</li>
<li>
<a href="local/delete">값 삭제</a>
</li>
</ul>
</li>
<li> Thymeleaf 문법
<ul>
<li>
<a href="th/thymeleaf1">타임리프 연습1</a>
</li>
<li>
<a href="th/thymeleaf2">타임리프 연습2</a>
</li>
</ul>
</li>
</ol>
</body>
</html>
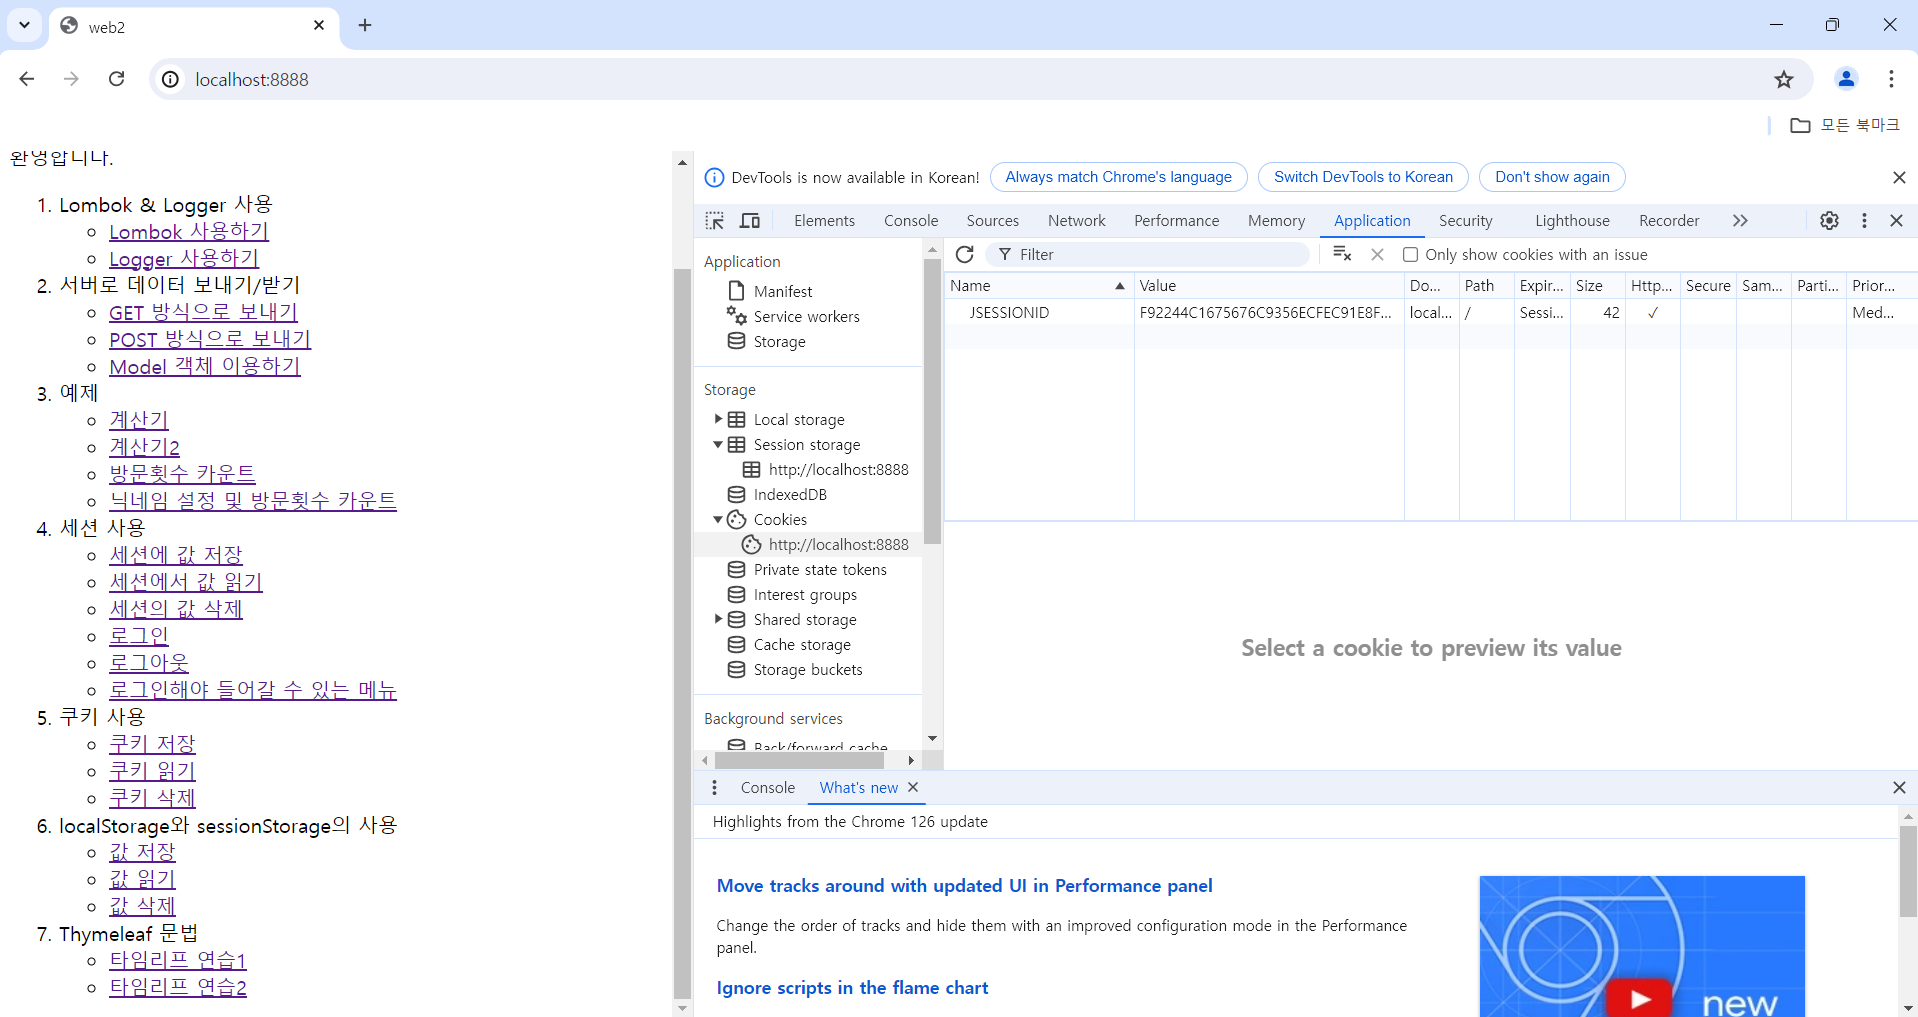
(5) 결과 화면
첫 접속 화면
"타임리프 연습1" 문구 클릭 시 화면
"타임리프 연습2" 문구 클릭 시 화면
홈페이지 화면(로그인하지 않았을 때)
홈페이지 화면(로그인했을 때)

1-2) 추가 정리 사항
“th:” 키워드가 붙은 속성은 전부 Java 서버에 넘어가서 실행되는 코드라고 보면 되고,
그 후에 나머지 HTML 코드를 실행하여 브라우저 화면의 내용을 보여주는 것이다!
절대 경로를 생성하는 기호 : @(at 기호)
<div th:object="${person}">
<p th:text="*{name}"></p>
</div>
나머지 “th:object”가 적용된 태그는 항상 “th:text”가 적용된 태그를 감싸고 있어야 한다.
(즉, 부모 태그이어야 한다.)
위와 같이 “*{name}”이라고 하면 “${person.name}”과 똑같은 코드라고 보면 된다!
<p th:text="${#numbers.formatInteger(n1, 10)}"></p>
바로 위의 코드에서 “10”은 자릿수를 지정하는 매개변수이다.
<p th:text="${#numbers.formatDecimal(n2, 3, 'COMMA', 2, 'POINT')}"></p>
바로 위의 코드는 “n2” 변수의 값(숫자값)을 3자릿수마다 “,”를 찍어 구분하고,
소수점 이하 2자리까지 표시하되 그 이상의 소수점은 반올림해서 표시한다는 의미이다!
객체에 맞게 다르게 동작하는 것을 “오버라이딩”이라고 한다.


