728x90
반응형
<목차>
1) CSS
1-1) 인라인 / 블럭 / 인라인블럭 요소
1-2) 배치(float / clear)
1-3) 가로 배치(float / overflow)
1-4) 메뉴 만들기
1-5) 시맨틱 태그
1-6) 예제
1) CSS
1-1) 인라인 / 블럭 / 인라인블럭 요소
11.CSS 인라인 요소.html
<!DOCTYPE html>
<html lang="en">
  <head>
    <meta charset="UTF-8" />
    <meta name="viewport" content="width=device-width, initial-scale=1.0" />
    <title>inline</title>
    <style>
      /*
                인라인 요소 : 해당 내용물에 따라 크기가 결정됨!!
                - 한 줄에 여러 개의 엘리먼트를 배치(블럭 요소 안에 포함)
                - 기본 너비값이 컨텐츠의 너비와 같다.
                - 크기값을 가질 수 없다.
                  (너비와 높이는 컨텐츠의 크기에 따라 결정)
                ex) a, img, br, span, input, textarea, label, button, ...
        */

      a {
        background-color: lightblue;
        color: black;
        text-decoration: none;
        border-radius: 10px;
        border: 1px solid lightskyblue;
        width: 300px;
        height: 200px;
        padding: 10px;
      }
    </style>
  </head>
  <body>
    <a href="https://www.naver.com">네이버</a>
    <a href="https://www.google.com">구글</a>
    <a href="https://www.daum.net">다음</a>
  </body>
</html>

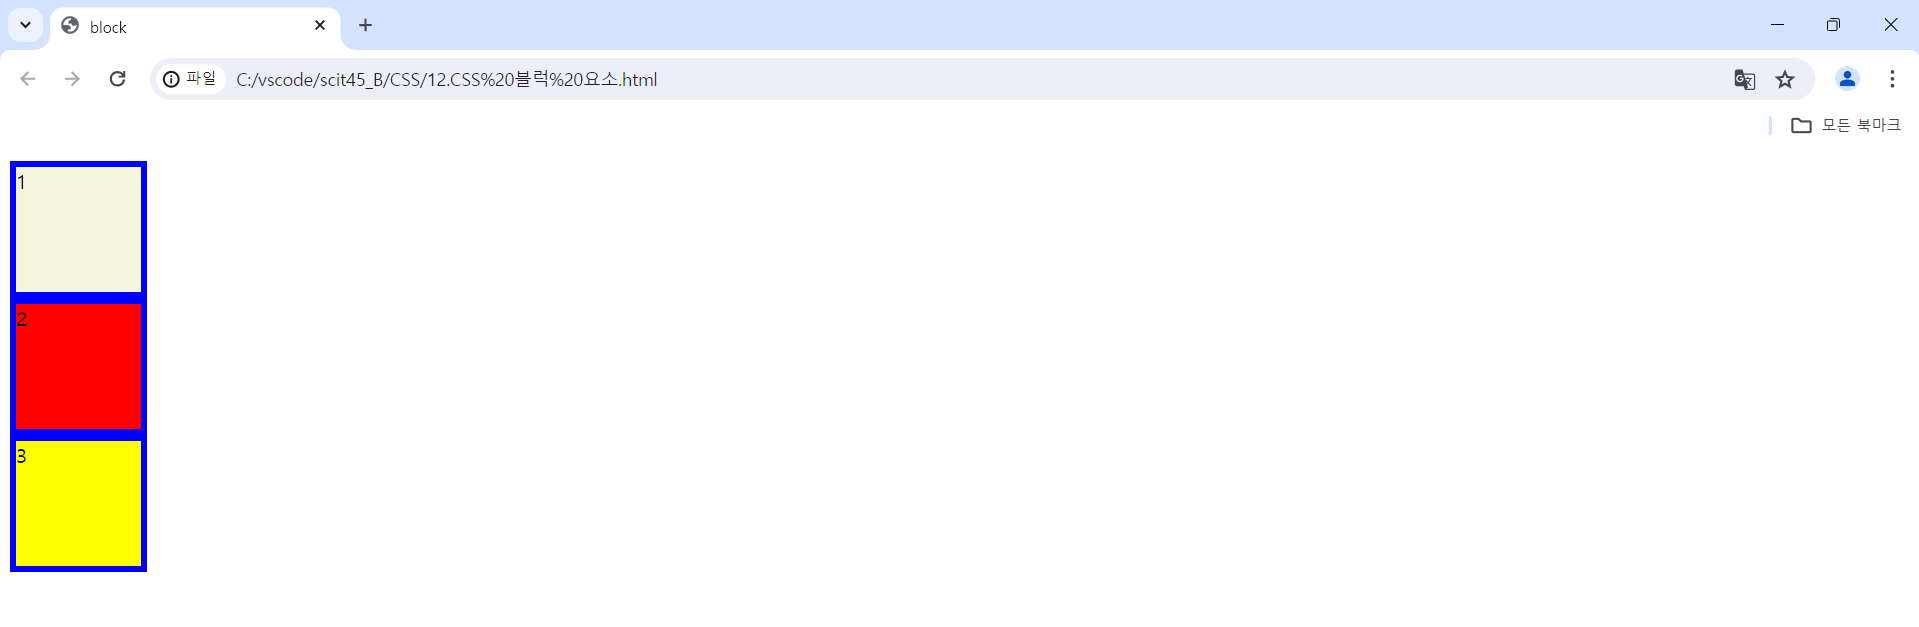
12.CSS 블럭 요소.html
<!DOCTYPE html>
<html lang="en">
  <head>
    <meta charset="UTF-8" />
    <meta name="viewport" content="width=device-width, initial-scale=1.0" />
    <title>block</title>
    <style>
      /*
                블럭 요소
                - 한 줄에 한 개의 엘리먼트를 배치
                - 기본 너비값이 100% 값을 갖는다.
                - 크기값(너비와 높이)을 가질 수 있다.
                ex) div, table, h1~h6, caption, header, section, p, ul, ol, td, th, hr
        */

      div {
        border: 5px solid blue;
        width: 100px;
        height: 100px;
      }
      #div1 {
        background-color: beige;
      }
      #div2 {
        background-color: red;
      }
      #div3 {
        background-color: yellow;
      }
    </style>
  </head>
  <body>
    <div id="div1">1</div>
    <div id="div2">2</div>
    <div id="div3">3</div>
  </body>
</html>
13.CSS 인라인블럭 요소.html
<!DOCTYPE html>
<html lang="en">
  <head>
    <meta charset="UTF-8" />
    <meta name="viewport" content="width=device-width, initial-scale=1.0" />
    <title>Inline Block</title>
    <style>
      /*
            인라인블럭 요소
            inline-block을 사용하면 엘리먼트가 인라인 요소처럼
            같은 줄에 배치되면서도, 블럭 요소처럼 너비와 높이를
            지정할 수 있다.
             - 크기값을 가질 수 있다.
            ex) img, input, button, ...
        */

      .inline-block {
        display: inline-block;
        width: 150px;
        height: 100px;
        margin: 10px;
        padding: 10px;
        border: 3px solid blue;
        line-height: 100px;
      }
    </style>
  </head>
  <body>
    <div class="inline-block">Box1</div>
    <div class="inline-block">Box2</div>
    <div class="inline-block">Box3</div>
    <div class="inline-block">Box4</div>
  </body>
</html>

1-2) 배치(float / clear)
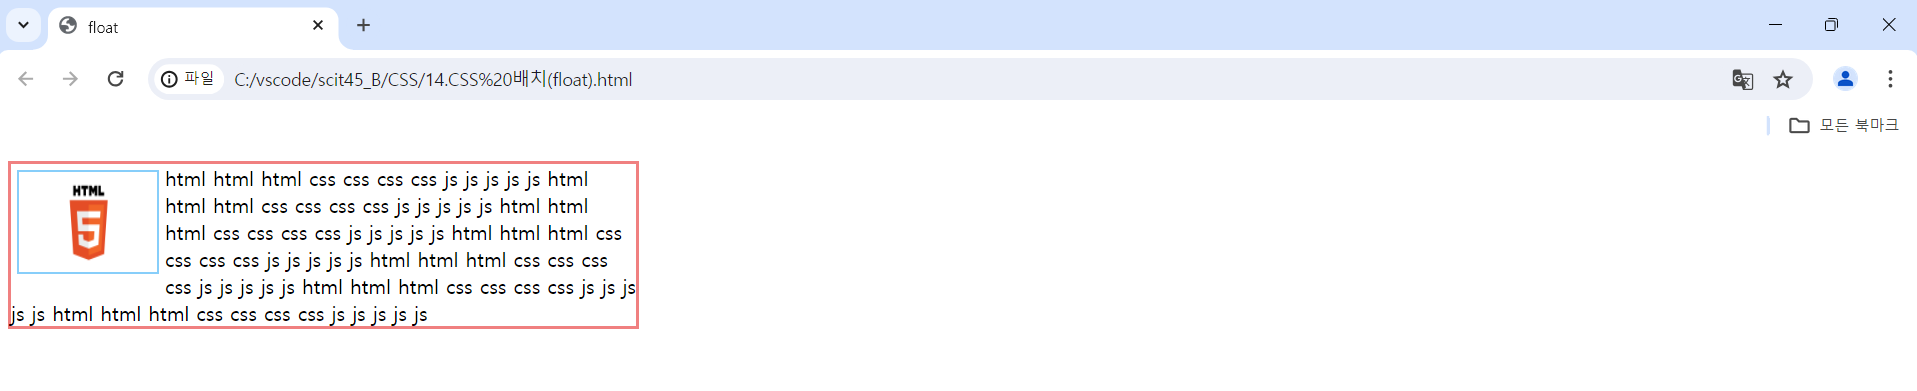
14.CSS 배치(float).html
<!DOCTYPE html>
<html lang="en">
  <head>
    <meta charset="UTF-8" />
    <meta name="viewport" content="width=device-width, initial-scale=1.0" />
    <title>float</title>
    <style>
      /*
            float
            웹 페이지에서 이미지를 어떻게 띄워서
            텍스트와 함께 배치할 것인가에 대한 속성.
            float 속성은 요소를 문서의 일반적인 흐름에서
            벗어나 배치할 때 사용.
            주로 텍스트와 이미지의 레이아웃을 조정하는데 사용.
        */

      .float-container {
        width: 500px;
        border: 3px solid lightcoral;
      }
      .float-container img {
        float: left; /* left right none 모두 가능*/
        margin: 5px;
        padding: 5px;
        border: 2px solid lightskyblue;
        width: 100px;
        height: 70px;
      }
    </style>
  </head>
  <body>
    <div class="float-container">
      <img src="../HTML/1.image/file/htmlLogo.png" />
      html html html css css css css js js js js js html html html css css css
      css js js js js js html html html css css css css js js js js js html html
      html css css css css js js js js js html html html css css css css js js
      js js js html html html css css css css js js js js js html html html css
      css css css js js js js js
    </div>
  </body>
</html>
15.CSS 배치(clear).html
<!DOCTYPE html>
<html lang="en">
  <head>
    <meta charset="UTF-8" />
    <meta name="viewport" content="width=device-width, initial-scale=1.0" />
    <title>clear</title>
    <style>
      .container {
        border: 5px solid red;
        width: 600px;
      }
      .top {
        background-color: aquamarine;
        height: 50px;
      }
      .left {
        background-color: blueviolet;
        width: 400px;
        height: 100px;
        float: left;
      }
      .right {
        background-color: orange;
        width: 200px;
        height: 100px;
        float: right;
      }
      /*
            clear : float 속성이 적용되면 다음 요소가
            자동으로 float 속성을 받는데 이것을 해제시킴
      */
      .clear {
        background-color: green;
        height: 50px;
        /* left right none both */
        clear: both;
      }
    </style>
  </head>
  <body>
    <div class="container">
      <div class="top">float: none</div>
      <div class="left">float: left</div>
      <div class="right">float: right</div>
      <div class="clear">float: clear</div>
    </div>
  </body>
</html>
1-3) 가로 배치(float / overflow)
16.CSS 가로 배치(float / overflow).html
<!DOCTYPE html>
<html lang="en">
  <head>
    <meta charset="UTF-8" />
    <meta name="viewport" content="width=device-width, initial-scale=1.0" />
    <title>float, overflow</title>
    <style>
      section {
        border: 5px solid blue;
        width: 640px;
        height: 100px;
        /* 부모 태그를 기준으로 자식 태그에서 부모 태그보다 더 넘어가는 부분은 안 보이게 가려주는 것이 overflow: hidden;이다!! */
        overflow: scroll;
        /* visible, hidden, scroll */
      }
      div {
        background-color: gold;
        width: 200px;
        height: 150px;
        float: left;
        border: 5px solid red;
        box-sizing: border-box;
      }
    </style>
  </head>
  <body>
    <!-- section 태그는 div 태그와 마찬가지로 영역을 담당하는 블럭 속성의 태그이다! -->
    <section>
      <div>Box1</div>
      <div>Box2</div>
      <div>Box3</div>
    </section>
  </body>
</html>

1-4) 메뉴 만들기
17.CSS 메뉴 만들기.html
<!DOCTYPE html>
<html lang="en">
  <head>
    <meta charset="UTF-8" />
    <meta name="viewport" content="width=device-width, initial-scale=1.0" />
    <title>Menu</title>
    <style>
      div.container {
        width: 700px;
        height: 50px;
        background-color: lightpink;
        margin: 0 auto;
      }
      ul {
        list-style-type: none;
        padding: 0;
      }
      ul > li {
        float: left;
        width: 20%;
        text-align: center;
      }
      a {
        display: inline-block;
        width: 100%;
        padding-top: 12px;
        height: 38px;
        text-decoration: none;
        color: darkgray;
      }
      /* 가상 선택자 */
      a:hover {
        color: black;
        background-color: darkcyan;
      }
    </style>
  </head>
  <body>
    <div class="container">
      <ul>
        <li>
          <a href="#">Menu-1</a>
        </li>
        <li>
          <a href="#">Menu-2</a>
        </li>
        <li>
          <a href="#">Menu-3</a>
        </li>
        <li>
          <a href="#">Menu-4</a>
        </li>
        <li>
          <a href="#">Menu-5</a>
        </li>
      </ul>
    </div>
  </body>
</html>

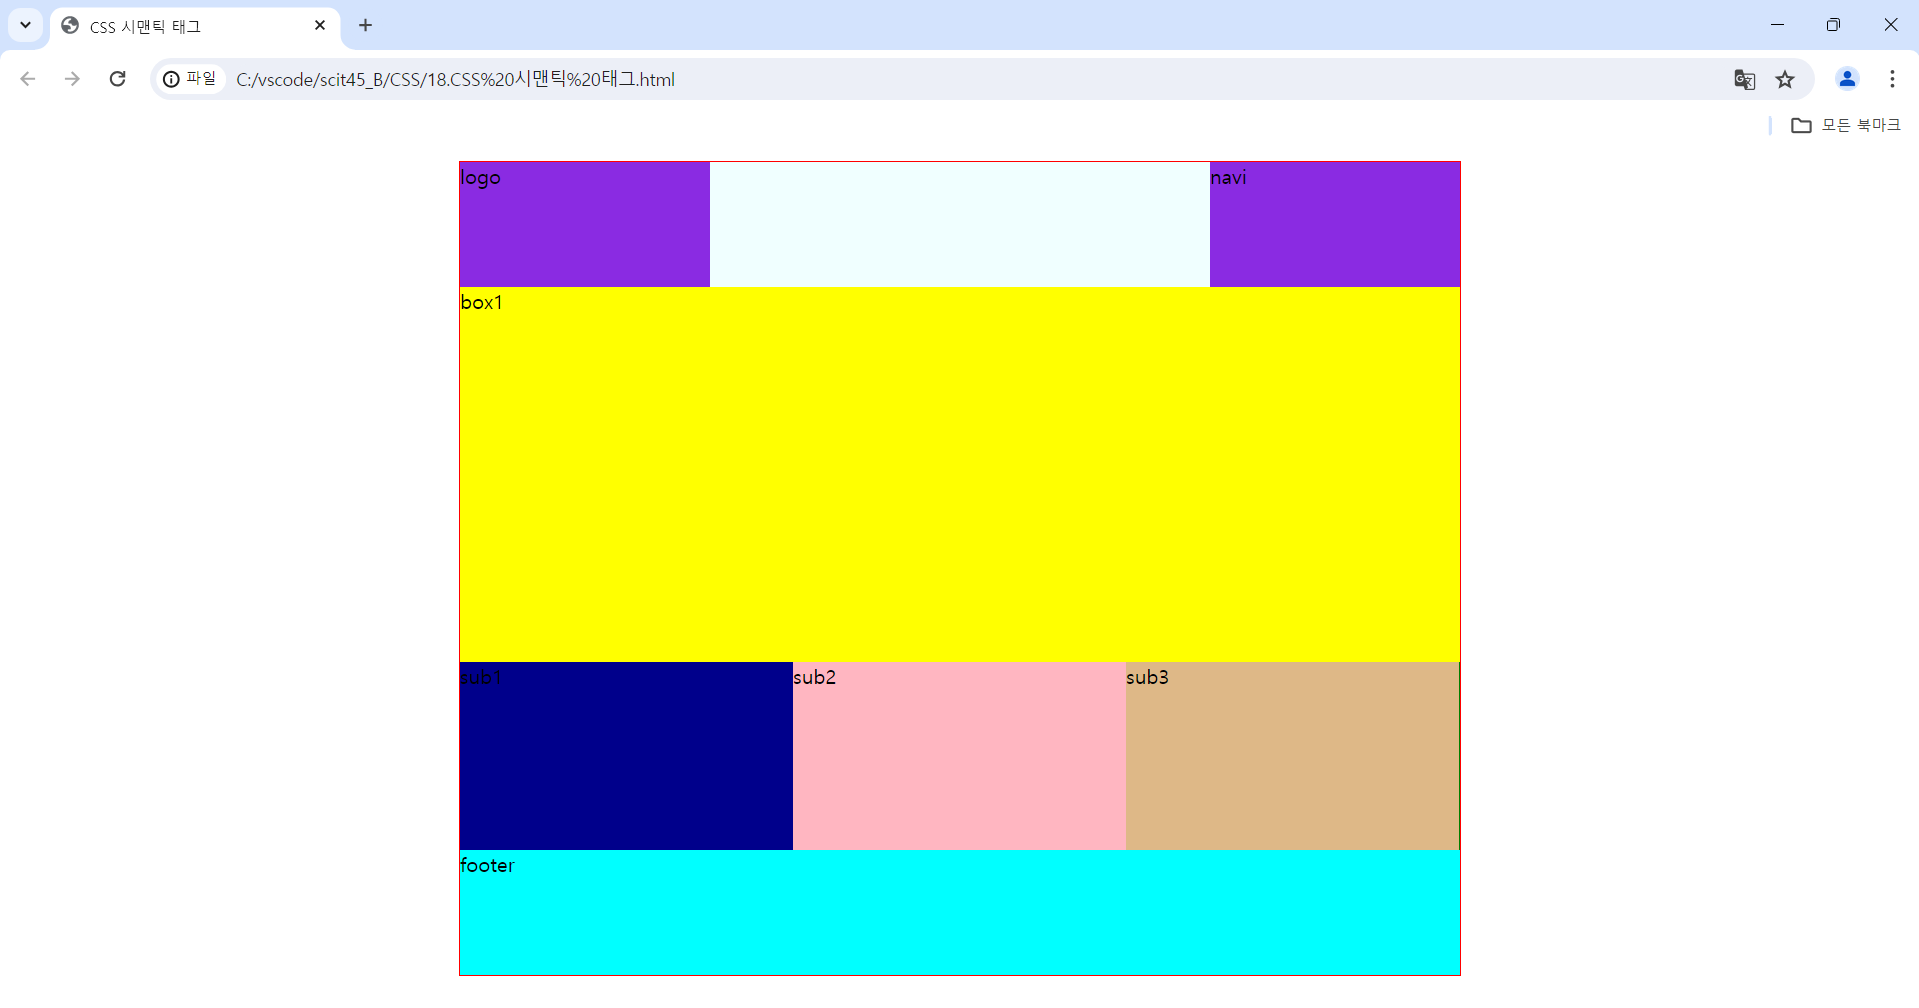
1-5) 시맨틱 태그
18.CSS 시맨틱 태그.html
<!DOCTYPE html>
<html lang="en">
  <head>
    <meta charset="UTF-8" />
    <meta name="viewport" content="width=device-width, initial-scale=1.0" />
    <title>CSS 시맨틱 태그</title>
    <style>
      .container {
        width: 800px;
        border: 1px solid red;
        margin: auto; /* margin: auto;를 적용하면 대상이 되는 태그의 범위를 상하좌우 모두 가운데 정렬시켜준다! */
      }
      header {
        background-color: azure;
        overflow: hidden;
      }
      header article {
        background-color: blueviolet;
        width: 200px;
        height: 100px;
      }
      .logo {
        float: left;
      }
      .navi {
        float: right;
      }
      main {
        background-color: yellow;
        height: 300px;
      }
      .box2 {
        background-color: green;
        overflow: hidden;
      }
      .box2 article {
        width: 33.3%;
        height: 150px;
        float: left;
      }
      .sub1 {
        background-color: darkblue;
      }
      .sub2 {
        background-color: lightpink;
      }
      .sub3 {
        background-color: burlywood;
      }
      footer {
        background-color: aqua;
        height: 100px;
      }
    </style>
  </head>
  <body>
    <div class="container">
      <header>
        <article class="logo">logo</article>
        <article class="navi">navi</article>
      </header>
      <main>box1</main>
      <section class="box2">
        <article class="sub1">sub1</article>
        <article class="sub2">sub2</article>
        <article class="sub3">sub3</article>
      </section>
      <footer>footer</footer>
    </div>
  </body>
</html>
1-6) 예제
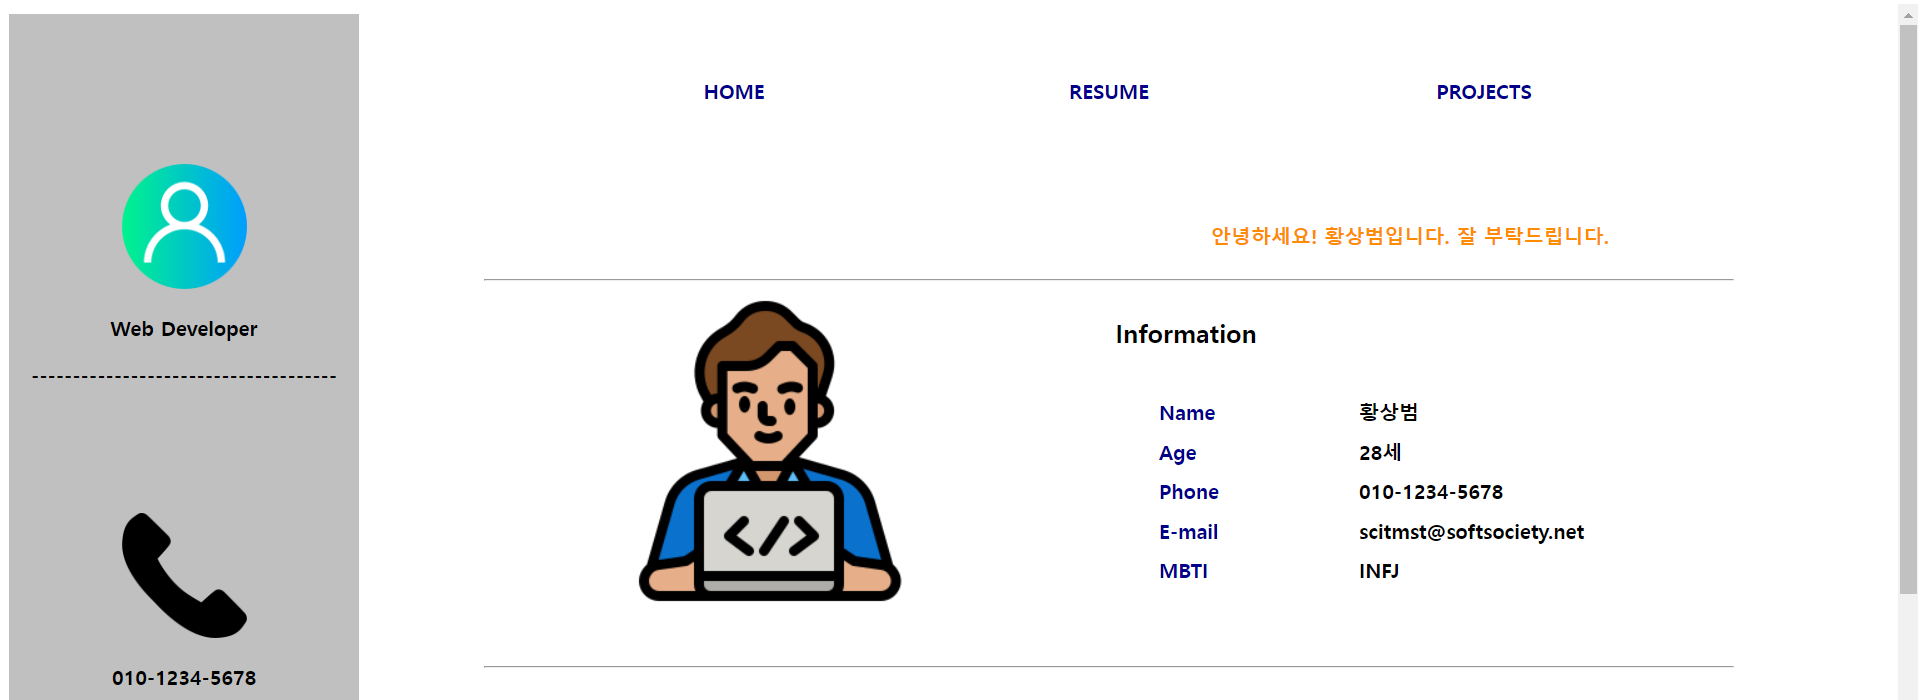
page practice.html
<!DOCTYPE html>
<html lang="en">
  <head>
    <meta charset="UTF-8" />
    <meta name="viewport" content="width=device-width, initial-scale=1.0" />
    <title>황상범 Introduce</title>
    <link rel="stylesheet" href="./css_folder/page practice design.css" />
  </head>
  <body>
    <div id="side">
      <div id="profile_img">
        <a href="#">
          <img src="../HTML/1.image/file/userImg.png" alt="userImage" />
        </a>
      </div>
      <div id="job">
        <p>Web Developer</p>
        <p>-------------------------------------</p>
      </div>
      <div id="phoneNumber">
        <img src="../HTML/1.image/file/phoneImg.png" alt="phoneImage" />
        <p>010-1234-5678</p>
      </div>
      <div id="email">
        <img src="../HTML/1.image/file/emailImg.png" alt="emailImage" />
        <p>scitmst@softsociety.net</p>
      </div>
    </div>
    <div id="main">
      <header>
        <article id="home">
          <a href="#">HOME</a>
        </article>
        <article id="resume">
          <a href="#">RESUME</a>
        </article>
        <article id="projects">
          <a href="#">PROJECTS</a>
        </article>
      </header>
      <section id="info">
        <div id="simpleIntro">
          <p>안녕하세요! 황상범입니다. 잘 부탁드립니다.</p>
        </div>
        <div id="profile">
          <hr />
          <div id="myImg">
            <img src="../HTML/1.image/file/profileImg.png" alt="myImage" />
          </div>
          <div id="myProfile">
            <div>Information</div>
            <ul id="infoMenu">
              <li>Name</li>
              <li>Age</li>
              <li>Phone</li>
              <li>E-mail</li>
              <li>MBTI</li>
            </ul>
            <ul id="myInfo">
              <li>황상범</li>
              <li>28세</li>
              <li>010-1234-5678</li>
              <li>scitmst@softsociety.net</li>
              <li>INFJ</li>
            </ul>
          </div>
          <hr />
        </div>
        <div id="tmi">
          <ul id="like">
            <li>좋아하는 것</li>
            <li>1. 소고기</li>
            <li>2. 돼지고기</li>
            <li>3. 닭고기</li>
          </ul>
          <ul id="dislike">
            <li>싫어하는 것</li>
            <li>1. 버섯</li>
            <li>2. 피망</li>
            <li>3. 비계</li>
          </ul>
          <ul id="well">
            <li>잘하는 것</li>
            <li>1. 의사소통</li>
            <li>2. 배려</li>
            <li>3. 프로젝트</li>
          </ul>
          <ul id="certifications">
            <li>보유 자격증</li>
            <li>1. 컴퓨터활용능력 1급</li>
            <li>2. JLPT N2</li>
            <li>3. ADsP</li>
          </ul>
        </div>
      </section>
      <footer>
        <div>
          <p>Copyright@sangbeomhwang.softsociety.corp</p>
        </div>
      </footer>
    </div>
  </body>
</html>
page practice design.css
#side {
  float: left;
  text-align: center;
  width: 280px;
  background-color: silver;
  padding: 120px 0;
}

#main {
  float: left;
  margin-left: 100px;
  width: 1000px;
}

#side img {
  width: 100px;
  height: 100px;
}

#side > div p {
  font-weight: bold;
}

#side > #phoneNumber,
#email {
  margin: 100px 0;
}

#main > header {
  padding: 50px;
}

#main > header article {
  width: 300px;
  height: 100px;
  float: left;
  text-align: center;
}

#main > header article a {
  padding: 40px 80px;
  color: darkblue;
  font-weight: bold;
  text-decoration-line: none;
}

#main > header article a:hover {
  color: black;
  background-color: darkcyan;
}

#main > #info {
  float: left;
}

#main > #info > #simpleIntro {
  float: right;
  margin-right: 100px;
}

#main > #info > #simpleIntro > p {
  font-weight: bold;
  color: darkorange;
}

#main > #info > #profile {
  float: left;
}

#main > #info > #profile > div {
  float: left;
  width: 500px;
  height: 300px;
}

#main > #info > #profile > #myImg > img {
  margin-left: 100px;
}

#main > #info > #profile > #myProfile > div {
  float: left;
  width: 100%;
  height: 50px;
  padding: 20px 0 0 5px;
  font-weight: bold;
  font-size: 20px;
}

#main > #info > #profile > #myProfile > ul {
  float: left;
  list-style: none;
  width: 120px;
  height: 200px;
}

#main > #info > #profile > #myProfile > ul > li {
  margin-bottom: 10px;
  font-weight: bold;
}

#main > #info > #profile > #myProfile > #infoMenu > li {
  color: darkblue;
}

#main > #info > #tmi {
  float: left;
}

#main > #info > #tmi > ul {
  float: left;
  list-style: none;
  width: 200px;
  height: 300px;
}

#main > #info > #tmi > ul > li {
  margin-top: 20px;
  font-weight: bold;
}

#main > #info > #tmi > ul > li:nth-child(1) {
  color: darkorange;
}

/* 바로 위의 코드와 동일한 코드이다. */
/* #main > #info > #tmi > ul > li:first-child {
  color: lightskyblue;
} */

#main > footer {
  float: left;
  width: 100%;
}

#main > footer > div {
  width: 500px;
  margin: 0 auto;
  text-align: center;
  font-weight: bold;
  color: darkblue;
}

'HTML & CSS > HTML & CSS(2024 version)' 카테고리의 다른 글
| CSS(1) - 기본 문법, 선택자, 텍스트, 목록, 자손 선택자, 박스 모델 (0) | 2024.05.30 |
|---|---|
| HTML(3) - form, input 태그 종류 (0) | 2024.05.29 |
| HTML(2) - 이미지, 텍스트, 테이블 관련 태그 (0) | 2024.05.28 |
| HTML(1) - WEB, HTML 개념 및 구조 (0) | 2024.05.27 |


